When deciding to migrate your existing infrastructure to Microsoft’s Office 365 Exchange Online cloud, there are lots of considerations to think about from both technical and administrative perspectives.
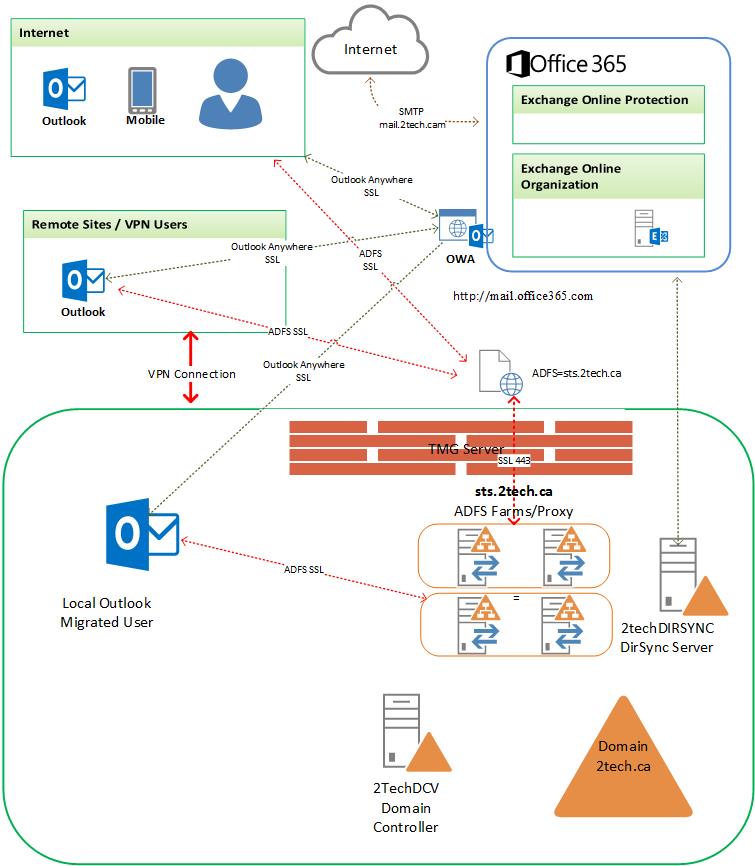
My blog will outline some of the scenarios you may face while successfully moving to office 365, using a Hybrid configuration to perform the migration in the following Exchange environment:
| Exchange Environment | Version |
| Office 365 | V15 |
| Exchange 2007 | SP3 CU 10 (later upgraded to CU 11) |
| Exchange 2013 (hybrid Server) | CU2 |
Reconfigure TMG Configuration
If you are using TMG server and publishing Exchange Hybrid URL to Internet, some of the default settings in TMG have to be changed for the migration to be successful.
I’m including a link to a detailed description from Microsoft
This is a common error when Exchange Online tries to access your on-premises hybrid server to create a move request.
New-MoveRequest -Identity user2@2tech.ca -Remote -RemoteHostName “owa.2tech.ca” -TargetDeliveryDomain 2techca.mail.onmicrosoft.com -RemoteCredential $RemoteCredential
The call to ‘https://owa.2tech.ca/EWS/mrsproxy.svc’ failed. Error details: The HTTP request was forbidden with client authentication scheme ‘Negotiate’. –> The remote server returned an error: (403) Forbidden..
To avoid this error, here are folders that have to be published during migration:

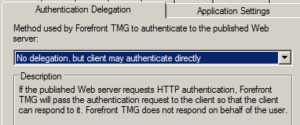
Make sure Exchange Online can authenticate directly to the Exchange Hybrid server as shown in the figure below:
Point internal and External Autodiscover Records to the Hybrid Server
- DNS record for Autodiscover (autodiscover.2tech.ca) must point to the hybrid server, internally and externally.
- The legacy exchange 2007 server must be setup to use Autodiscover from the hybrid server. Use this command to change the Autodiscover record on exchange 2007:
Set-ClientAccessServer –Exchange2007 –AutodiscoverServiceInternalUri https://autodiscover.2tech.ca/autodiscover/autodiscover.xml
Failing to do this will cause Outlooks to prompt users for a password from time to time.
Assign UPN Suffix Prior to Running Initial DyrSync
Align all UPN suffixes correctly. If you have two or more UPN suffixes in your company, be sure that all suffixes are correctly assigned to the users before you run the initial DirSync.
You can easily change UPN if you are using the same suffix. If you run ADUC and change bill@domain1.com to Bill2@domain1.com, DirSync will update the user’s Azure ID appropriately.
If you are changing suffix for users (example bill@domain1.com to bill@domain2.com), Dir sync will not accept that change and it will not update the user’s Azure ID.
The best way to resolve this issue is to reset Azure UPN for particular users to bill@domain1.onmicrosoft.com and after that reset the local UPN from bill@domain1.com to bill@domain2.com, then DyrSync will pick up and propagate the change next time it runs.
Large Mail Limitation
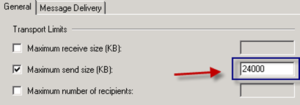
Microsoft limits message size to 25 MB. Email larger than 25 MB cannot be migrated to Office 365. We need to limit the Maximum send size of large items to some value lower than 25 MB. Setup this limit before you start cleaning mailboxes for large emails.
Transport Settings
There is no native Exchange 2007 tool that can export emails larger than 25 MB. We are using the Large Message Exporter Tool from MessageOps. It is a third party tool which is no longer supported, however, you can download it from here:
http://www.messageops.com/software/office-365-tools-and-utilities/messageops-large-message-exporter
I’ve included some tips on how to use this tool:
- Unhide all hidden accounts so the tool can see them:
Get-Mailbox -ResultSize unlimited | where {$_.HiddenFromAddressListsEnabled -match “true”} | select name,PrimarySmtpAddress | export-csv c:\reports\hidden.csv
- You can use an account with full mailbox access permissions on all mailboxes. In case you have BES deployed, use the BESAdmin account, which already has the required permission.
- Install Outlook 2007 but do not apply any service pack or update, otherwise, it will break the tool.
- Be creative in explaining to the customer/management why you have to use a third-party unsupported tool and run it on an unpatched workstation, give it the highest privileges in exchange (Full Mailbox Access ), and run the tool against every single mailbox in your organization.
Find Out the Accounts That Have Email Policy Setting Disabled
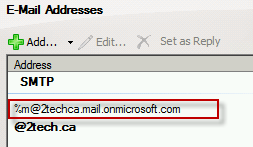
The Hybrid Configuration Wizard will add @yourtenantname.mail.onmicrosoft.com E-Mail address to you main E-mail address policy. This address will be used to route emails to and from Office 365.
There are some users who have Automatic Policy Update unchecked.
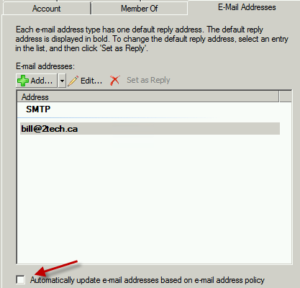
This is the error you’re going to get if users have no Microsoft routing address assigned.
The target mailbox doesn’t have an SMTP proxy matching ‘2techca.mail.onmicrosoft.com’.
The Microsoft email address must be assigned to all mailboxes that are going to be migrated to Exchange Online:
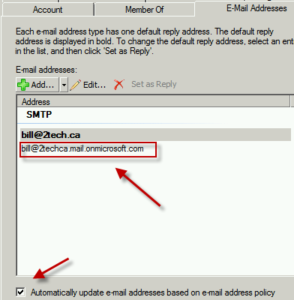
After you have assigned the correct address, run DyrSync and rerun the move request.
This time mailbox will get migrated without errors.
Here is a little PowerShell command to list all users who have no policy assigned:
Get-Mailbox -results unlimited | select DisplayName,Alias, EmailAddressPolicyEnabled,HiddenFromAddressListsEnabled,ForwardingAddress, ForwardingSmtpAddress,SamAccountName,PrimarySmtpAddress | export-csv c:\reports\NoPolicy.csv
Migrate Mailboxes
We intend to move all on-premises Exchange functionality to the cloud. It will not be possible to do this all at once in a single cutover weekend, so there is the need to provide coexistence for some duration of time.
Microsoft Exchange 2013 supports mailbox moves and migrations using the Exchange Management Shell, specifically the New-MigrationBatch cmdlet. The difficulty with this new cmdlet is that you cannot control migration per user. You are controlling the migration moves for the whole batch only.
Instead, we continued to use the old good New-MoveRequest to perform the migration.
Connect to Exchange Online:
$TenantCreds = Get-Credential
$Session = New-PSSession -ConfigurationName Microsoft.Exchange -ConnectionUri https://ps.outlook.com/powershell/ -Credential $TenantCreds -Authentication Basic –AllowRedirection
Import-PSSession $Session
Create a New Move Request if you want to migrate a mailbox to Exchange Online:
- RemoteHostName: External URL for the hybrid
- RemoteCredential: On-premises admin credentials.
- SuspendWhenReadyToComplete: Switch to seed all mailboxes up to 95 % and suspend the data copy.
New-MoveRequest -Identity user@2tech.ca -Remote -RemoteHostName owa.2tech.ca -TargetDeliveryDomain ‘2techca.mail.onmicrosoft.com’ -RemoteCredential $onprem -SuspendWhenReadyToComplete -AcceptLargeDataLoss -BadItemLimit 100 -BatchName IT
Create New Move Request if you want to migrate a mailbox back to the on-premises hybrid server:
We were not able to migrate back to original Exchange 2007 server. Migration back to the Hybrid Exchange 2013 worked fine.
- Outbound: Specifies that this mailbox move is from Exchange Online to on-premises.
- RemoteTargetDatabase: Is the database on your hybrid server.
- RemoteCredential: Is the credential for the Exchange administrator on-premises.
- TargetDeliveryDomain: Is the on-premises SMTP domain.
$OnPremCreds = Get-Credential
New-MoveRequest -Identity user@2tech.ca -OutBound -RemoteTargetDatabase ‘Mailbox Database Hybrid’ -RemoteHostName ‘owa.2tech.ca’ -RemoteCredential $OnPremCreds -TargetDeliveryDomain ‘2tech.ca’
Migration Order
If you have a large user population, you will need to move users in batches. Some of the permission between Exchange Online and on-premises mailboxes can break.
We used this third party script to pull out all rights on the shared folders in a mailbox (Calendar, Inbox, Notes, Tasks, Journal) and also pull the Outlook Delegates and the rights assigned to the delegates, such as Private Items access and Meeting recipients:
http://gsexdev.blogspot.ca/2008/10/exchange-reverse-permission-audit.html
The following table outlines which permission combination will work and which will not.
| Type | Users on-premises accessing shared resources in Office 365 | Users in Office 365 accessing resources on-premises |
| New Delegation | NO | NO |
| New Shared folder permission | NO | NO |
| Existing Delegation | YES | No |
| Existing Full Mailbox Access | YES | No |
Recommended list for moving mailboxes in batches:
| Order | User Type |
| First | Users who are not using any shared resources. |
| Second | Resources , room, shared mailboxes, shared calendars |
| Third | Delegates, users who are using rooms, shared mailboxes etc. |
If the delegate stays on-premises and the shared mailboxes are moved to Office 365, the next time when the delegate launches Outlook, it will prompt them to login to Office 365 even if their mailbox is on-premises. That login will provide the user with access to the shared mailbox in the cloud.
Default MRM policy
The following table shows the retention tags and their settings that are available and assigned by default in Exchange Online. Those tags are linked to the Default Retention Policy that is applied to all new mailboxes:
| Tag name | Tag type | Retention age limit (days) | Retention action |
| Default 2 years move to archive | All | 730 | Move to Archive |
| Recoverable Items 14 days move to archive | Recoverable Items | 14 | Move to Archive |
| Deleted Items (*) | Deleted Items folder | 30 | Delete and Allow Recovery |
| Junk Email | JunkEmail | 30 | Delete and Allow Recovery |
| Personal 1 year move to archive | Personal | 365 | Move to Archive |
| Personal 5 years move to archive | Personal | 1825 | Move to Archive |
| Personal never move to archive | Personal | No age limit | Move to Archive |
| 1 Week Delete | Personal | 7 | Delete and Allow Recovery |
| 1 Month Delete | Personal | 30 | Delete and Allow Recovery |
| 6 Month Delete | Personal | 180 | Delete and Allow Recovery |
| 1 Year Delete | Personal | 365 | Delete and Allow Recovery |
| 5 Year Delete | Personal | 1825 | Delete and Allow Recovery |
| Never Delete | Personal | No age limit | Delete and Allow Recovery |
(*) Note: Be aware of the Deleted Items policy. It will start deleting all email older than 30 days for newly migrated mailboxes.
Attributes that Are Synced to Windows Azure Active Directory
At this time, an Office 365 user’s ForwardingAddress attribute is not synchronized from the on-premises AD to the Azure AD.
Here is setting on the old Exchange 2007:

Settings in Office 365 after Migration:

This setting will need to be configured manually after migration.
List of attributes that are synced by the Windows Azure Active Directory Sync tool:
http://support.microsoft.com/kb/2256198
Email Flow Issues Between On-premises and Office 365
After you run the Hybrid Configuration Wizard and setup all inbound and outbound connectors, mail should start flowing between on-premises and Exchange Online mailboxes.
We encountered a problem with mail flow from on-premises to Exchange Online. After checking the queues on the Hybrid server, we noticed emails sitting in the queue with the following error:
451 4.4.0 Primary target IP address respond with with: “451 5.7.3 Must issue a STARTTLS command first”
The Hybrid server could not establish STARTTLS to Office 365. We ran out the old Telnet and checked SMTP connectivity to Exchange Online:
Telnet 2techca.mail.protection.outlook.com 25
2techca.mail.protection.outlook.com is your MX address in Office 365.
ehlo

There is no STARTLS.
In our case, Office 365 rejected the connection because our external IP was blacklisted at the Spamhaus website
We removed the external Hybrid IP from http://www.spamhaus.org/ and performed a telnet test again:
Telnet 2techca.mail.protection.outlook.com 25
ehlo

Now we see STARTTLS and email flow is back.
Public Folders Migration Tips
To migrate Public Folder in Exchange Online follow this link:
http://technet.microsoft.com/en-us/library/jj983799(v=exczzg.150).aspx
After you successfully bring the Public Folder Migration Request to Autosuspend (95%), you will need to lock out Public Folders on-premises. This is a point in time where downtime starts for your users.
When you run Set-OrganizationConfig -PublicFoldersLockedForMigration:$true, users are not locked out of Public Folder immediately. It can take 1-2 hours for the settings to propagate.
Users will get the following error when they try to access Public Folders:
Cannot expand the folder. Microsoft Exchange Server is not available.
After you lock out the on-premises Public Folders, you can start finalizing the Public Folder Move Request. This last step can take a tremendous amount of time even if you have no virtual “delta” data in your Public folders. All-access to public folders is down during this migration phase.
Here is one of the examples I faced with one of my last migrations:
- The last finalizing step in my case took 18 hours for 500,000 items and 170 GB worth of data.
- The problem is that you don’t have any idea on how far you are in this finalization phase.
- The PercentComplete value shows 95% at first second and still shows 95% after 18 hours.

Log files are inaccessible:
After you bring the migration request to Completed status (100%), you will want to check the statistics and the log files:
Get-PublicFolderMigrationRequest | Get-PublicFolderMigrationRequestStatistics | Fl
Output:
| Name : PublicFolderMigrationStatus : Completed
StatusDetail : Completed SyncStage : SyncFinished Flags : CrossOrg, Pull RequestStyle : CrossOrg Direction : Pull Protect : False Suspend : False SourceVersion : Version 8.3 (Build 298.0) AuthenticationMethod : Ntlm BadItemLimit : 20000000 BadItemsEncountered : 68255 LargeItemLimit : 1000000 LargeItemsEncountered : 12 QueuedTimestamp : 2/13/2014 11:12:29 AM StartTimestamp : 2/13/2014 11:15:08 AM LastUpdateTimestamp : 2/26/2014 2:37:36 PM InitialSeedingCompletedTimestamp : 2/22/2014 11:21:43 PM FinalSyncTimestamp : 2/26/2014 10:50:02 AM CompletionTimestamp : 2/26/2014 2:37:21 PM SuspendedTimestamp : OverallDuration : 13.03:24:51 TotalFinalizationDuration : 08:37:06 TotalDataReplicationWaitDuration : 00:02:41 TotalSuspendedDuration : 2.16:47:27 TotalFailedDuration : 03:28:08 TotalQueuedDuration : 00:01:50 TotalInProgressDuration : 10.05:56:27 TotalStalledDueToCIDuration : 00:04:52 TotalStalledDueToHADuration : 00:00:20 TotalStalledDueToReadThrottle : TotalStalledDueToWriteThrottle : TotalStalledDueToReadCpu : TotalStalledDueToWriteCpu : 01:44:34 TotalStalledDueToReadUnknown : 02:06:26 TotalStalledDueToWriteUnknown : TotalTransientFailureDuration : 03:51:11 TotalIdleDuration : 04:15:09 MRSServerName : CO1PR02MB127.namprd02.prod.outlook.com EstimatedTransferSize : 0 B (0 bytes) EstimatedTransferItemCount : 0 BytesTransferred : 174.3 GB (187,182,825,579 bytes) BytesTransferredPerMinute : ItemsTransferred : 547504 PercentComplete : 100 PositionInQueue : PreventCompletion : False FailureTimestamp : IsValid : True |
Pull out a detailed log to see where we have corruptions:
Get-PublicFolderMigrationRequest | Get-PublicFolderMigrationRequestStatistics -IncludeReport | Export-CliXML C:\Reports\miglogs.xml
We got the following error after this command:
The current deserialized object size of the data received from the remote server exceeded the allowed maximum object size. The current deserialized object size is 209747968. The allowed maximum object size is 209715200.
It looked like the reports were too large for PowerShell to handle. We increased the MaximumReceivedObjectSize to 300 MB using the following command:
New-PSSessionOption -MaximumReceivedObjectSize 300000000
After we increased MaximumReceivedObjectSize and run the report again, the account got locked out by Office 365. It took an hour for the account to get unlocked.
Get-PublicFolderMigrationRequest | Get-PublicFolderMigrationRequestStatistics
This operation exceeds the throttling budget for policy part ‘LocalTime’, policy value ‘3000000’, Budget type: ‘PowerShell’. Suggested backoff time 300000 ms.
We did call Microsoft to see if we can get logs from their OPS team. They were unable to provide log files.
We used our old command to pull out all public folder stats.
Get-PublicFolder -Recurse -ResultSize Unlimited | Get-PublicFolderStatistics | Export-CSV C:\Reports\Office-365PFStat.csv
We merged folder paths and item numbers for the old Exchange 2007 and the new Office 365 Public Folders using Excel. We were able to identify which folders had missing items. In our case we had only 10 folders listed.
Enabling Modern Public Folders for All Mailboxes.
In the previous step, we copied the Public Folder contents from on-premises to Exchange Online and also checked for corrupted items.
Until now, all mailboxes were assigned to Public Folder proxy mailbox located on-premises:
Get-Mailbox | ft name,DefaultPublicFolderMailbox
Output:
| Mailbox DefaultPublicFolderMailbox——- ————————–
User1 PFMigrate1 User2 PFMigrate1 |
To get Public Folder configuration at the Organization level:
Get-OrganizationConfig | fl PublicFoldersEnabled,RemotePublicFolderMailboxes
Output:
| Property Settings————————— ———-
PublicFoldersEnabled Remote RemotePublicFolderMailboxes PFMigrate1 |
Run the following command to check if public folders settings have been replicated:
Get-Mailbox User1 | fl name,DefaultPublicFolderMailbox
It can take 30-60 minutes for this setting to propagate to Outlook. After all testing is complete, we needed to switch access to public folders for everybody.
Run from Office 365:
Get-Mailbox -PublicFolder | Set-Mailbox -PublicFolder -IsExcludedFromServingHierarchy $false
Run from on-premises Exchange 2007:
Set-OrganizationConfig -PublicFoldersLockedForMigration:$true
We waited 2 hours for Active Directory replication in Exchange Online to propagate the changes. Then we ran the same commands again:
Get-Mailbox | ft name,DefaultPublicFolderMailbox
Output:
| Mailbox DefaultPublicFolderMailbox——- ————————–
User1 PFMigrate1 User2 PFMigrate1 |
And:
Get-OrganizationConfig | fl PublicFoldersEnabled,RemotePublicFolderMailboxes
Output:
| Property Settings————————— ———-
PublicFoldersEnabled Remote RemotePublicFolderMailboxes PFMigrate1 |
As you can see, nothing happened in the background. Setting up IsExcludedFromServingHierarchy to $false should switch PublicFoldersEnabled to Local and RemotePublicFolderMailboxes to $null.
We decided to run the following command to initiate a manual change:
Set-OrganizationConfig -PublicFoldersEnabled local -RemotePublicFolderMailboxes $null
We waited 10 minutes and started to see some changes in our system:
Get-Mailbox | ft name,DefaultPublicFolderMailbox
Output:
| Mailbox DefaultPublicFolderMailbox——- ————————–
User1 Mailbox1 User2 Mailbox2 |
And:
Get-OrganizationConfig | fl PublicFoldersEnabled,RemotePublicFolderMailboxes
Output:
| Property Settings————————— ——–
PublicFoldersEnabled Local RemotePublicFolderMailboxes |
At this point, users started getting the new configuration and were able to access the modern public folders in Office 365.
Decommission Public Folders from the Old Server
The last issue you may run into is when you try to delete Public Folders from the old Exchange 2007 server. When you try to delete Public Folder Database you will get the following error:

It looked like it was a bug on Exchange 2007 SP3 CU10, which was fixed on CU11:
http://support.microsoft.com/kb/2852663
Once you apply CU11, you will be able to remove the Public Folder Database.
Public Folder Size Limitation
Microsoft limited public folder size to 2 GB. During the migration of Public Folders from on-premises to Office 365, all Public Folders larger than 2 GB will not be migrated and will be marked as corrupt.
Here are the default limits for Public Folders:
You may get the following error if you try to post something in a Public Folder that is already full:
Your public folder “\NewYork\Project\Supply” is full.
| Current size | Maximum size |
| 2048 MB | 2048 MB |
Users will no longer be able to post items to this folder. Please reduce the size of your public folder by deleting any items you don’t need.
To remedy this issue, my recommendation is to use the following command in Office 365 to increase the limit:
Set-OrganizationConfig -DefaultPublicFolderProhibitPostQuota 8147483648
Set-OrganizationConfig -DefaultPublicFolderIssueWarningQuota 7147483648
Be sure the limit is increased before migrating Public Folders.
I hope you find this information useful for you current or future Office 365 migrations.
Thank you!